Thursday, April 28, 2016

#YourEduStory: Brown-out: it's a real thing

This week's #youredustory topic: what's your biggest challenge as an educator? As a person?

I purposely wrote this topic because we often forget one another's struggles. We become observed in our own struggles. We hide our own challenges. We don't post the full picture.

So, this week is a chance to be authentic and to provide support for those in your educator community or greater community.

Last year, I read an article about brownout and I instantly connected with it. It's something many of us have or have experienced it in the past. You may even know someone who's dealt with it.

For me, the realization was embarrassing. And, I felt alone in that feeling.

I was still the same self I knew - I worked hard and I would not settle for failure. Sure, I'd fail. But, I'd never let that be my resting place. When I admitted I was suffering from brownout, I felt like I was quitting; like I wasn't giving my  best effort. And, I was embarrassed by that. I was comparing what was really happening with my views of how I should be behaving. And, that's a hard comparison to hold.

I found myself trying to compete with everyone and everything. It was less about learning and more about competing. And, after a while, that is overwhelming. I came home and continued to work. I never unplugged.

There is no one way to suffer from brownout. For me, I didn't give up my other loves. I felt more compelled than ever to continue them. In fact, I felt stressed to make sure I found time for them. If I didn't have time to paint, I felt stressed. If I didn't have time to visit my family, I felt stressed. If I had to do work when I got home, I felt stressed. I felt I couldn't escape being stressed.

Brownout can be about the job, but it's usually something larger. For me, it was a reminder that I have many ambitions that I want to pursue. And, that is my stress-er. My own drive for success has the potential to drive me to brownout.

And, it did. I can't pinpoint a particular day, but I know the time when I stopped feeling joy from the things that I did to make me happy.

At the time, I felt alone in my struggles. As an active sharer and participant on Google + and Twitter, I was sucked into the "echo chamber." I only saw the great things everyone else was doing or trying to do. I wanted to do it all as well, but yet, struggled to find the joy I found on their social media faces. I found that, while we are great at sharing ideas, we struggle in sharing our struggles.

It wasn't until I read a blog from The Nerdy Teacher, who opened up about his depression, that I realized other successful educators have struggles. It wasn't until I opened up about my own frustrations that I found others - many others - who shared in my journey.

We ask students to reflect on their online self vs. their real self, but, as educators, we do not always do this. I looked at my online self and realized others would never know I struggled with brownout. So, here I am - sharing and hoping others will too.

I also recognize that my personality is prone to brownout. I'm ambitions. I'm competitive. I want to learn more. I want to do more. I want to be more. But, at the end of the day, that can be stressing. It can also be taking work home and letting it consume your time. And, this is the number one factor leading to brownout. For me, I have to continuously check myself. It will never be as simple as "don't do too much." But, it is possible. And I also recognize that many highly successful people have these same qualities. It's what drives you and burns you.

So, I challenge you to take a moment to reflect on your online self. Who are you? Do you represent the real you? Do you find yourself competing with others online? Do you want to try everything?

While these qualities make use better, they also can lead us to brownout.

Think...do you (from "Are You Suffering From Brownout":


  • Work long hours, but without any real interest in your job? Is work a dull slog and does it lack intellectual challenge or stimulation.
  • Feel as if you never really finish tasks? There’s always more to do.
  • No longer know where your career is going?
  • Pour cold water on other people’s ideas?
  • Use any excuse not to show up? A headache becomes a migraine and a cold is always flu.
  • Check emails when you get up in the morning and in bed before you to sleep? Glued to your Smartphone? 
  • Feel out of shape, eat junk food, lack sleep?
  • Feel you’ve lost your sense of humor and tend towards passive aggressiveness and surliness. 
  • Come home late to watch TV and show little interest in your spouse and children? Friendships have withered on the vine and outside interests have been forgotten.
  • Feel you're boss is moody and unpredictable (though you don't hate your boss)? You never know whether they’ll like or hate a given piece of work.

When I answered these questions, I found myself answering "yes" to many. I felt like I never finished any tasks. In many ways, I still do. So, this year, I've made a goal to finish what I started - this includes all of the crafts, cleaning, etc. And, you know what? I feel accomplished in that. I finished a quilt I started four years earlier. Not only did I feel accomplished, but I spent time doing an activity I enjoyed. A win-win.

If you found yourself answering "yes" to any of the questions or if you feel exhausted right now (let's face it - who doesn't?) My advice to you:


  1. Be a full person online. You don't have to share every personal struggle. However, you should represent both sides to your story. For instance, if you share that you did an awesome maker unit, share where that unit fits into the larger picture. What challenges did you face along the way? What challenges do you still face? I know I'm guilty of this as well - especially in my personal life. We see the highlights. 
  2. Don't compare yourself to others online. Remember - you  see the highlights so don't live the highlight reel. Use what you see and read as inspiration but remember that you are only seeing a slice of their story. Keep yourself grounded in those around you.
  3. Remember what you value and don't lose sight of it. At the end of a hard day, it can be exhausting and difficult to be positive to those around you. And, that's okay. But, don't forget what you value. Make time for it. Schedule it if you need to, but don't miss out. And, if finding time for it is stressing you, reevaluate your tasks and priorities. What are you doing that you can drop?
  4. Leave your Smartphone and devices behind. This one is very challenging for me. I'm in the edtech industry (or whatever we want to call it now)! But, the phone becomes a clutch. I find myself checking my emails when I first wake up and before I close my eyes at night. I find myself feeling anxiety over notifications. I find myself using it to avoid awkward social situations - to get out of having to have a real conversation. It gets more attention than some I love the most. Don't love your Smartphone. Use it as a tool to spend more time with those you love. It's that distinction that makes all the difference. 
  5. Exercise. Those who know me probably think this is easy for me to say because I do workout excessively. I know this. But, I love it. The more difficult the workout, the happier I am. You don't have to be a workout nut like me to exercise. The point is you should make time for it each day. This is not only because it is essential to health, but because it is rejuvenating. I started taking short walks outside periodically throughout the day and, gradually, it made me look forward to each day a little more (especially when I find myself dreading the coming days).
I spend a lot of time teaching digital citizenship to tweens and teens, but not enough to my peers. We need to support one another - especially in the area of showing our authentic selves. 

Be authentic. Be you. Be okay with you. 


Tuesday, April 26, 2016

More secrets of a Google Ninja

Today's blog post brings you two new secrets of a Google Ninja!
  • Google Save: I had noticed this for a bit, but hadn't paid much attention to it until I read Eric Curts' blog post on the tool. This will allow you to save images and websites virtually without downloading!
  • Chrome Music Lab: This is for music-lovers of all ages!  You can now explore the way music works and, since it is open to all developers, develop your own music experiment. 
Explore these handy tools and more at the full Secrets of a Google Ninja presentation or on fennovation.org (where there is an Awesome Table directory).

I will be sharing all of these tools - yes, all - at the Techs4Tex Texas Summit on Saturday, May 14 in Frisco, Texas. Tickets are still available if you're near the area!  

Friday, April 22, 2016

Girl Power: Coding Edition

This year has been an amazing year for bringing awareness to the gender gap...especially in the STEM industry.

And, recently, I discovered two more organizations that are helping reduce the gap.

Check out:


To see a more extensive list of programs to join as well as resources to assist the girls in your life in STEM (computer science, and more!), check out Girl Power.

Check out fennovation.org for a complete list of STEAM resources as well. 

Wednesday, April 20, 2016

Chromium Creativity

Chromebooks are a great device for being productive, but they can be overlooked when it comes to creation. Though I have nothing against MacBooks' performance, their price is steep. For a fraction of the price, you can get a Chromebook that can create beautifully. If you are a professional designer, a MacBook or another full-scale device might be necessary. However, for the average consumer, Chromebooks offer a full line of free or affordable apps for creation.

I've organized some of my favorite creation tools for K-12 students into Chromium Creativity (it says K-5 since many can be used for K-5, but they could also be used for K-12). Per viewer suggestions, I've also added in suggested ages as it can sometimes be hard to find appropriate applications for PK-2 students. Check the presentation notes section for more details.

Check out fennovation.org for even more Googleness!

Friday, April 15, 2016

Hosting a family coding night - a review

This week, I hosted a family coding night for all staff, students, parents, and community members.


The advertisement - created using Canva.

After talking with parents throughout the year, I found that many wanted to engage with their children while using technology, but didn't know how. I'm an advocate of creating with technology. So, with that in mind, I decided to offer a night of coding and creating for all families and staff.

In making plans for the event, I considered time, location, and topics. The last time I held a school maker night (though well attended), several attendees suggested having the event later, after practice. I also wanted to make sure the location would be able to hold many students and parents. So, I held this event from 5:30-7:30PM in our library with the intent of recruiting more of our high school students.

Before creating the event, I searched what other schools around the world were doing. I stumbled upon one school who hosted sessions for families to attend - like an actual conference. I loved this idea. This would give families designated times to attend things that interested them.

I decided to offer sessions in 30 minute time slots - so a total of four sessions possible to attend. Then, I divided up topics by the device. For instance, I offered four sessions of coding on the iPad/Chromebook; four on desktops, four through robotics/microprocessors, and four without a device. You could split this differently, but I thought these would introduce families to the types of devices they could use to code. For each device, I found a tutorial for a coding session. For instance, I found one on Hopscotch with iPads. Every session had a linked tutorial assigned to it. The idea behind this - students could continue their learning and creation when they returned home.


With the schedule in place, I started recruiting volunteers. I sent out emails to our students, our parents, area organizations, and former students. At first, it seemed to be pulling teeth to get volunteers, but I eventually got plenty of volunteers for the event. Advice: Don't stop asking for help. I found that - through repetition - I convinced more to join our efforts.

After recruiting volunteers, I began the bulk of the work - setting everything up. Since I only wanted our volunteers to be facilitators, I had to make sure everything was set up. The challenge - students were still using the library during set-up and throughout the event. So, I had to continually check on our areas to make sure they had not been "re-designated" by students. I printed off signs, session cards for attendees to take with them throughout the night, and materials for the no device area. I set up obstacle courses for the Sphero with duct tape, card board, and the like. To figure out what I needed to do, I went through the schedule and made a list of all of the materials listed in each tutorial. Give yourself plenty of time for this portion. I started a few days early, gathering materials, charging devices, and printing signs.

You can view the complete Agenda with a description of events, links to tutorials, and sessions.

When the night finally came, a few attendees showed up right at 5:30, but most arrived around 5:40ish.

The hits:

  • The Sphero and Tickle apps were a crowd favorite. But, before them, was the Arduino and the Make Crate session hooked all students! 
  • Attendees loved the choice in the sessions
  • We provided room for others to continue learning a topic if it interested them
  • The set-up beforehand was solid so we did not have technical difficulties


The things I would change:

  • We did not have upper school students attend. I am guessing there is still a stigma around the word "coding." Plus, many of our students are over-committed. As a new program, it's hard to gain new members from the upper school. Lastly, we listed topics by what they would learn rather than by what they would create. The next time - I'm changing this to the things they will create. I believe this will help boost attendance since we had a large number attend our maker night. Clearly, there is an interest - it has to be in the wording and the recruitment.
  • More careful scheduling. I paired the Arduino session - a major hit - during the same time as some other topics that would have been popular. As a result, they were not as well attended.
  • In some areas, I would make them more informal. For instance - in the robotics area, I'd like to have this be a full two hours, but for students to pick an area (Raspberry Pi, Arduino, etc.) they would like to explore. Volunteers would be on hand to assist attendees in exploring. 
I look forward to making changes to improve the next event. I also hope to bring in more area businesses who will, hopefully, sponsor the event. Food is a big selling point - which we did not have. I'd even like to add in some competitions for the end of it. 

Ideas? Share them with me!


Wednesday, April 13, 2016

Raising student voices - the power of a positive online presence

I speak often about how I dislike the idea of focusing on what not to do online. We spend a lot of time instilling fear in adults and students about the online world rather than teaching them how to use to make change. In the process of teaching the don'ts, we've actually stopped teaching. We've started fearing. 

So this year, we've made an effort to focus less on the don'ts and more on the dos. 

Yesterday, we held two chapel services - one for middle school students and one for high school students (we are a private Episcopalian school so it works!). Over the past two months, we recruited various students who were rumored to have online presences. These online environments could be anything from a music sharing site, YouTube channel to a crowdsource funding page. 

After getting a list of all of the rumored students, I sent out emails and used word of mouth to get in touch with the students. Though it took several attempts, I was able to get four high school and two middle school students to present, which was perfect due to our time limitations. 

I met with each group, provided them with a script and turned them loose with a few questions.

The rest...they did. And, I was blown away. 

I let each student know they would have three minutes or less to share their online presence, using my questions as guidance. I assigned them an order and asked them to send me the specific links they wanted us to show while in chapel. Once we received the links, we took screenshots of them in the event Wifi went down, and we reviewed the content. One student's music site had curse words in the comments section. Though, the student brought this up ahead of time and reminded us to make sure not to show certain sections. 

I wish I had recorded the chapels, but I only managed to sneak a few photos of the students. I asked a teacher to read a quick 30 second intro and conclusion before the students spent the remaining 12 minutes sharing their work. 

Below is the script I sent students and assisting faculty. 


Topic: Feature 3-4 students at SSES who use their online presence for positive actions.
Date: 4/12/16
Students:

Agenda:


  • Overview - narrate: “Today, we have several St. Stephen’s students here to share examples of their online presence. Your online presence is anything that can be found when Googling your name. It’s important to not only avoid negative topics, but to make your name noticeable through the positive things you do online. For example, you can create a crowdsourcing page to raise money for a charity. You can start your own art portfolio. You can teach others on YouTube. Find your passion and share it. The following students did just that.” Teacher narrator.
  • Introduce students in order (in background, project student site)
  • Student 1 [steps to mic/podium]: (about 2-3 minutes)
    • explain what your online presences is
    • show what your online presence is
    • explain why you created your online presence
    • explain how you created your online presence
  • Repeat for other students (2-3 minutes for each student)
  • Conclusion - narrate: “Please help support these students. And, we challenge you to start something positive online. Raise money for a cause near to you. Teach others your skill. Share with others your passion.” Teacher narrator.


Each student was unique. No student fit any particular description. This helped keep it diverse and more approachable. One student even passed out fliers for interested girls who wanted to join her organization.

The bottom line - help raise student voices. Don't instill fear in those voices. I'm sure our chapel did not change behavior overnight, but I hope it did inspire others to use their voice to do good. I want to teach students to be positive. But, to do that, they have to use their voices.

Monday, April 11, 2016

Get your Google Sites ready for the summer

It's better late than never to start work on your online presence. Google Sites, though not perfect, are a tool of choice because of their integration within other Google Apps. That said, they can be use for far more than a teacher Website. Use them for digital portfolios, newsletters, events, directories, and much more!

And, if you're using them for teacher Websites, why not structure your courses on your site so that they look like touchscreen apps? Many times, I see courses in a traditional drop-down list with a lot of text. While this was common in the early 2000s, most students use a touchscreen device when accessing online content. And...that is not the most effective way of reaching that audience. I've started making my site full of pictorial boxes so they are not only easier to see, but easier to access.

Try out this idea:
Make your page with all of your courses look similar to Google Classroom.


You can make these boxes in Google Drawings and then, just hyperlink each box (see my image map tutorial below) to the correct page. OR...you can take a screenshot of your Google Classroom and insert it in Google Drawings. Then, just draw invisible boxes (see my image map tutorial below) over the squares and hyperlink them to the correct pages. This will make your courses page more visually pleasing while also being more accessible.

Check out my beginner and advanced Google Sites tutorials for more ideas. Thinking of doing portfolios next year with your students? Why not start now?!

Check out fennovation.org for more Googleness!


Wednesday, April 6, 2016

I was still using old Forms...but why?

Recently, I was helping a teacher create a superlatives voting Form. Previously, I had used the new Google Forms, but found some of the question types weren't there or it was missing some functionality. So, I told her to just switch to the old Forms for now.

After speaking with her though, I decided to actually compare/contrast the two. And, I'm ashamed to admit that I had not realized the new Forms has caught up with the old Forms. Though I use it several times a week, I had decided to stay in the old Forms (in my school account) and in the new Forms (in my personal). But, after reviewing the two, the only substantial difference is in the view.

Here's the breakdown of the new vs. old:

The interface:

The new Google Forms certainly has a cleaner interface. It looks more friendly. However, it lacks some of the functionality of the old Forms.

Old Forms is on left; new Forms is on right

Settings: 
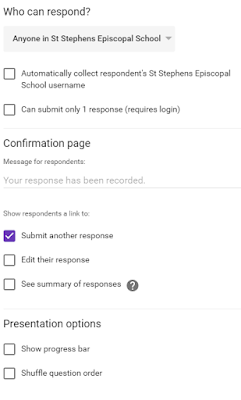
The settings are located in different locations in the versions. In the old version, the settings appear at the top and at the very bottom. In the new, you must click the gear (a consistent tool throughout Google products) to view the settings. While this helps keep the interface cleaner, it is another click for users.

In the old Forms, you have the following options.


In the new Forms, you will see the same options, but in a different layout.


Themes:
In the old Forms, users can change fonts, font sizes, colors and, backgrounds. In the new Forms, users can add an image of their own to the header (same as old). However, it will automatically pair a solid color with it. It also does not allow for font selection and font sizing.

Questions:
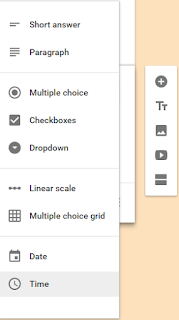
The old Forms offers the following questions types.


And, the new Forms offers the following question types.


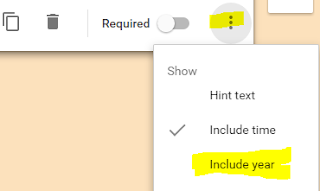
For a while, when you selected Date or Time as question types in the old Forms, you could choose to do both. For instance, if you selected Date, you could add Time to that question as well. In the new Forms, this was not an option. It is now, but it is disguised...


Otherwise, the question types are the same - only in different locations.

Responses:
This feature is definitely improved in the new Forms. Now, you can view a summary of responses (previously only accessible through the corresponding sheet) and the individual responses. Before, it only showed the responses in a spreadsheet. Now, you can see them in their Form view and print/save as PDF in that view as well. This is a huge improvement.

Individual response view:


Summary response view:


Add-ons:
This feature is the same in new and old. However, I find it a bit confusing. there is a button that says "add-ons" when you hover over it. These are the add-ons YOU have installed. To get more, you have to click on the three vertical dots in the far right and choose "Add-ons."


Sharing Form:
The sharing feature is nearly the exact same. The only difference is in the appearance and location. The only real difference is in viewing the live Form. In the old version, you could click on "View Live Form." This is now called "Preview."

I have finally moved both of my views to the new Google Forms. Though, I miss the editing features of the fonts in the old...

You can check out some of my favorite Forms features and uses in Fabulous-ize Your Forms presentation. You can also check out fennovation.org for all things Drive.

Enjoy!

Let's get Chromified with new Chrome treats!

Weekly, I find myself asking - I wonder if there is something within Chrome that can do that? Though I've know about Pushbullet for a while and have even shared it with others, I didn't find a need to use it until this week. This week, I grew tired of responding to texts on my phone. Yes, a silly reason, but a reason, nonetheless. With Pushbullet, you can get all phone notifications on your computer - regardless of where your phone is. You can also send and receive text messages. If you have a habit of forgetting is phone, it doesn't matter - you can still send and receive your text messages. Pretty cool, right?

There's even more coolness to be shared. Don't forget to check out fennovation.org for all things Chrome, including an awesome table directory of resources.

Updates this month include:

  • Copy folder App - similar to the script, but now an app that will allow you to make copies of your Google Drive folders. Hopefully, this will someday be an innate feature in Drive...
  • Duplicate file finder and cleaner for Drive - this finds duplicate files and allows you to clean them. I can think of many who could benefit from this...
  • All things PDFs - this list of tools will help you split PDFs, merge PDFs, compress PDFs and much more!


Tuesday, April 5, 2016

Coding programs to start your summer

It's getting to be that time again...that end-of-the-school-year time. And, with that, why not check out some great coding and gaming programs to indulge in for the summer?

I've created an ongoing list of programs, tutorials, and sites dedicated to teaching you a variety of coding languages and gaming programs. 

And, while your at it, check out fennovation.org for more STEM resources. Enjoy!

Learn to Problem Solve with Code
Resources by Christy Fennewald




Coding cover.png

Applications, Games & Products


All Ages

Elementary

Middle School

High School and beyond


Learning & Teaching (How Tos and more)


All Ages


Elementary

Middle School

High School

Outreach


All Ages


Elementary

Middle School

High School


Girls-only

Articles