Check it out and check out fennovation.org for all things Google Sites!
Thursday, September 29, 2016
Thinking about using the new Google Sites?
Sadly, the period to request to try the new Google Sites is over. However, if you applied for it for your domain and are on the fence of whether or not to use it, you should definitely take the plunge. Over the past four months, I've tested it out by building over ten Sites for a variety of purposes. Though the new Google Sites needs very little hand-holding, I made an updated presentation to outline the features and make it even that much simpler!
Check it out and check out fennovation.org for all things Google Sites!
Check it out and check out fennovation.org for all things Google Sites!
Monday, September 19, 2016
Updates to favorite Google Apps
It's been a while since I've added some of my favorite updates to the Google Apps suite so, in case you have not heard about these features in the past few months, check them out!
- Google Docs Outline - it's been around for a while now, but it still impresses me. I can keep a running document easily by simply making titles or headings. This creates a search/tag menu on the left-hand side for easy access.
- Google Slides templates - freegoogleslidestemplates.com & slidescarnival.com are my two favorites
- Embed charts from Google Sheets in Google Slides
- When copying a file, immediately place it in a new folder.
Click below for updates to the Google Apps presentations:
Check out fennovation.org for all things Google. Enjoy!
Thursday, September 15, 2016
Confessions of a maker - Maker Studio class year 1
We are in our fourth week of school and it already feels like it should be the last week. September is hard. It's especially difficult when you are starting something new.
After starting the beginnings of a maker program last year with a maker faire night and monthly maker parties, five teachers (including myself) took on the task of teaching a course on maker.
Last spring, we got the approval of our curriculum committee to offer a Maker Studio course, aimed at students in 9-12 grades. In proposing this class, we gathered ideas from universities like MIT, UT, and Indiana to develop a sound proposal. For our course, we wanted the students to use the design process so, we have taken our course design through the design thinking process as well.
Our design proposal: Maker Studio offers the opportunity to develop skills in ideation, design, creativity, prototyping, and collaboration. These skills allow students to fully participate in shaping the world around them through deeper understanding of the possibilities and problems of new physical and information technologies. This course focuses on key design elements of the Maker movement, along with how Making supports science learning by providing opportunities to deepen engagement, intentionality, innovation, collaboration, and understanding.
Maker skills provide a powerful way to inspire students' interest, engagement, and understanding in science. The course is taught through cross-disciplinary hands-on projects where students will use a variety of maker tools including, but not limited to, 3D printing, Raspberry Pis, Arduinos, and Makey Makeys. There will be a different instructor for each rotation, allowing the class to be taught by a panel of experts, where each instructor teaches a discrete unit. Students will reflect on each project, writing a concise summary of what they did, including their design process, issues encountered, and future applications of the skill. A digital portfolio will be kept throughout the class, and there will be periodic presentations of their projects. The course will culminate with an individual project that incorporates several of the skills learned throughout the course.
Currently, I am the section teacher of this course so my thoughts will change as a I become a spectator teacher of the course.
Empathize: “To create meaningful innovations, you need to know your users and care about their lives.” After we took the course for approval to the curriculum committee, we spent time deciding our desired audience. At the time, we knew data suggested more middle school students attended the maker events than upper school students. However, due to scheduling restraints at the middle school, we decided to bring the course to the high school. With that, we attempted to narrow down grade levels - 9, 10, 11, 12 or all. We decided to open it to all as to not exclude anyone in year one. However, after four weeks, we have observed the social dynamics play a critical part in students staying in the course. Due to the wide spectrum of grade levels and "friend groups" in the course, some withdrew after the first day due to more of a social reason.
Defining the course: After getting approval for the course and selecting our target audience, we worked on a course design. We decided upon several main factors that would be consistent in the course. This is an area we have had to come back to many times. We got approval for the course in February. However, that left us the spring and summer and figure out the course. In a standard course, this time would not be as essential. However, in this course, it proved most important. We tried to work remotely over the summer, but in the end, we found schedules conflicted and time ran out. As a result, our definition of the course was rather weak. That affected us dramatically in the first week. We set out offer five distinct sections in the course - each taught by a different teacher. And, we decided that journals, portfolios, and projects would be our three grading elements. However, the specifics of those elements were not defined as well. As a result, we have had to spend a lot of time redefining journals, portfolios, and project design.
Ideate: “It’s not about coming up with the ‘right’ idea, it’s about generating the broadest range of possibilities.” For the purpose of course design, we are generating a broad range of possibilities as we go through the course. During the early summer, I found an alumnus who worked in renewable energy - our first topic - and after several discussions, she agreed to come talk to our students. This fueled further ideas of section field trips or speakers. The course is divided into five sections so each has its own set of ideas. Since I am teaching first, I am generating more ideas for future section teachers.
Prototype: “Build to think and test to learn.” Our prototype and testing are more or less the same. Since, we never had an audience to test on. This year will serve as our prototyping year. Next year, will be further testing. For now, I've included our thoughts in the testing section.
Testing: “Testing is an opportunity to learn about your solution and your user.”
We are currently in this stage. This has been the most arduous and grueling in many ways. The design was nothing compared to the revisions that we have made along the way.
Our school has a very unique schedule so this course is running as a 1/2 credit, Pass/Fail course currently. With that, we meet 3 days of every rotation (rotation is 8 days). 2 days are 45 minutes each and 1 day is 60 minutes.
Day 1 - all five section teachers met to introduce ourselves and the course. With a 45 minute class period, this did not leave much time for anything else. At the end of day 1, 5 of our 12 total students dropped the course. They were all freshmen and I attribute it to social reasons.
Day 2 - I began my section. Originally, we decided my section would go second. However, due to summer scheduling changes, the teacher set to go first, was no longer able to, so I went. Unfortunately, my section was not designed to be the hook. Day 2 began with an introduction into sustainability as my section is about creating a sustainable solution with recyclable and renewable resources. It was evident the class was not wanting to discuss.
Day 3 - We continued discussion of the recycling process in order to empathize. It was evident the class did not read and did not want to discuss. Students were threatening to leave.
Back to the drawing board.
Day 4 - We spent the class allowing students to give voice about the class - what do they want. After this class, we deferred to the students.
Days 5 & 6 - We allowed the students to create without giving background on sustainability (due to students saying they preferred to read on their own). Instead, students went right into building. I do not support this model, but found it was necessary to get back momentum.
Day 7 - We regained the course. As teachers, we met again to reiterate our common goals for the course - journaling, design thinking, and portfolios. After this, we got our footing back and students were thrust into prototyping.
Since beginning the course, we have set up weekly meetings among the section teachers in order to adapt the course as we go. This is crucial. I have also found that a balance between teacher voice and student voice is necessary. No voice should outweigh the other.
After day 9, we will begin the last project in my section - creating renewable resources. With the course now moving in a forward motion, I hope to reiterate the design thinking process.
_________________________________________
Curious about our Maker Studio journey? Don't worry! I'll be continuing this series with updates on the process.
Below, you can find resources to get you started on your way. The most important thing about maker education is learning from and adapting from your mistakes. In this case, it is also, learning from others' mistakes.
Course Website
Rubrics, Resources & more for sustainability
Journaling requirement
Journaling template
Sample portfolio - Bulb
Portfolio guidelines and grading
Grading guidelines
Check out the Maker Journey presentation for my maker process from start to now. Also, check out fennovation.org for all things STEAM.
Enjoy!
Tuesday, September 13, 2016
Back to school with Google Classroom
Google Classroom got many new updates over the summer! While I'm still waiting for the ability to move items around on the About page, add sub groups, change ownership of items (so teacher retains ownership of tests, etc. after returning) and permanently pin items to the top of the stream page, I am even more excited about Google Classroom.
Over the summer, Google added the ability to:
Over the summer, Google added the ability to:
- See Guardian summaries
- Add topics to the Stream (for better organization)
- Annotations on mobile devices (would love for this to be on Desktops/Chromebooks!)
- And several other smaller features
Check out Getting Automated with Google Classroom for all that you can be with Google Classroom. And, consult fennovation.org for all things Google.
Thursday, September 8, 2016
Getting Girls into STEAM & CS
This year, I've organized two separate coding clubs for our 6-12 grade school. And, for the first time, I'm happy to see that half of the members are girls. For the first time, it appears, the literature and the pushes to make STEAM more hospitable to girls are showing their effects. I've had several girls come to me, mentioning that they know how essential it is. Yes, 9th and 10th grade girls. So, I share with you more resources so the movement continues to grow strong. I can't wait to see the industry in a few years. What will it look like? What will we be doing?
Check out Girl Power for more resources and fennovation.org for more STEAM resources. Enjoy!
Check out Girl Power for more resources and fennovation.org for more STEAM resources. Enjoy!
Tuesday, September 6, 2016
Tips & tricks of a #gafe user
More updates will follow, but for now, check out some of my favorite hacks or tips & tricks for becoming a GAFE power user.
Check out fennovation.org for more things Google. And, check out Google Apps Hacked!
Check out fennovation.org for more things Google. And, check out Google Apps Hacked!
Monday, September 5, 2016
Kick off the year with secrets of a Google ninja
What better way to kick off your year than with some of Google's lesser known tools. Over the summer, I accumulated more tools that can broaden your classroom's horizons.
New updates include:
New updates include:
- Google Spaces
- Google Arts and Culture
- Google Science Journal
- Science Journal
- Google Performing Arts
- Global Forest Change Explorer
Check out fennovation.org for more secrets of a Google Ninja plus write-ups on the new "lesser known" tools. And, see the full Secrets of a Google Ninja presentation here.
Friday, August 26, 2016
Getting your Google Search on
Let's start the 2016-2017 school year by teaching our students how to search. Let's not simply ask them to search. Let's teach them HOW. Being able to search, find, and evaluate information are critical skills. Think about how many times a day you use them. However, it's often assumed students just know how to search, find, and evaluate. On something this critical, it's not beneficial to students to just assume.
So, I've prepared some of my favorite search, find, and evaluate strategies built into Google in one presentation: Become a Search Ninja. Know of more? Share with me!
Check out fennovation.org for all things Google.
So, I've prepared some of my favorite search, find, and evaluate strategies built into Google in one presentation: Become a Search Ninja. Know of more? Share with me!
Check out fennovation.org for all things Google.
Thursday, August 25, 2016
Let's Get Chromified for the school year!
The new school year has started and it's time to get your Chrome game on. Check out Let's Get Chromified for tips and tricks for better managing your Chrome account as well as the best apps and extensions for your respective education role.
Check out Fennovation.org for a directory of all things Chrome as well as Chrome-specific presentations on creativity and productivity.
Enjoy and welcome back to school!
Check out Fennovation.org for a directory of all things Chrome as well as Chrome-specific presentations on creativity and productivity.
Enjoy and welcome back to school!
Friday, July 29, 2016
Are we teaching the right skills?
I hold a high school degree, a Bachelor's degree, a Master's Degree, and a Specialist's degree. I hold countless certifications.
On paper, I meet the educational requirements of most jobs I desire. However, that assumes that those degrees and certifications are teaching the skills the job needs.
I have been out of the classroom for six years now, but this year, I'm going back. I'll be teaching high school English again in addition to a cutting-edge, Makerspace course at a college preparatory 6-12 grade school. As I prepare to teach ninth grade English, I'm reminiscent of my own schooling. On paper, these students meet the requirements of most major colleges. In the classroom, they excel.
Yet, we continue to have thousands and thousands of jobs in the U.S. that our students are not qualified to fill. And, it isn't because their paper resumes don't fit. It's because they lack the actual skills to do the job.
I read an article in the Harvard Business Review recently about the skills gap that I've become familiar with. In the graphic design industry, schools teach the current skills necessary to be successful on the job. They don't teach the "future" skills because they don't know them. However, we shouldn't focus on the actual content skill, but the learning skill necessary to be a successful employee. Why don't we focus on teaching students how to "learn on the job," how to search and evaluate? We need to redefine the skills we want students to learn. The major skills employers say students lack? Soft skills. Yes, soft skills, followed by leadership and computing skills.
Not content.
It's a way of thinking. It's a way of innovating.
As I prepare to teach The Odyssey to freshmen in a pre-made curriculum, I question what skills we are engineering in students. What is the end goal? What job do we hope this will prepare them for?
Check out this school that is functioning as a business. Students leave with skills - of all kinds - to start work.
I don't think the education system has failed. I refuse to call it a failure. But, I don't think it's working as well as it needs to be.
It's time to step back and assess where are our jobs? What skills are our students lacking? Do we all need to go to a four-year university? Do all jobs require a four-year university? Is there anything wrong with going to technical school instead of a four-year university?
Right now, I hear speeches on making college free for all, but nothing to change the effectiveness of college. If you went to college, did the four-year university prepare you more for your job than a technical school would have? Where did you learn most? For me, it was on the job. I loved my time at college, but I'm the first to admit that it could have been done in less time (and I even got out in half the time) with more time spent tinkering, exploring, innovating.
What do we need more of in this world? What problems do we need to solve?
That's what we want to teach.
Jobs are changing fast. I feel it is impossible to keep up with the content changes. But, it is possible to keep up with the learning changes. It is possible to recognize that our students need to learn differently to be successful.
Imagine a world where we could fill the jobs that are open. Imagine the economic boost. Imagine the impact it would have on families, on innovation, on communities.
Education won't solve it all, but it is certainly a great starting place.
Wednesday, July 13, 2016
Finally...the new Google Sites!
Thanks to my co-worker, Brian Gray, we have the new Google Sites on our school domain. Over the past month, I've had the opportunity to test it out and rebuild some of my old sites in the new version.
While the new version still lacks some necessary features like being able to hide pages from the navigation bar (but still have them visible), remove header slots, control width of site, and control some of the font colors (limited options), the simplistic design is ideal for teachers. In fact, I would not want too many options. The more options, the more room for "ugly" Sites and...who wants that?
With the new Google Sites, you are guaranteed to have a more professional looking site.
I plan on updating my fennovation.org Google Sites resources as I find more ways to customize your Sites (beyond the how-tos out there currently).
In the meantime, check out the new version or our digital citizenship site as compared to the traditional Google Sites version.
I used Canva to create a header (public version so you can make a copy and edit it). I also used Canva to create circle icons on some of the pages (public version so you can make a copy and edit it).
And, because the Awesome table folks are so awesome, they have made Awesome tables accessible on the New Google Sites!
To use it, you can still create an existing Awesome Table (see my previous blog).
Once you have created one, you can see your creations from Awesome Tables. Since I already had them in my existing site, I was able to go to the old site and go to editing mode.

Then, I clicked on the Awesome Table & the gear.

From that menu, I clicked on the table name.

Then, I changed the URL from "edit" to "view."

Next, I copied that URL.

Then, I went to the New Google Sites and, under "insert," I clicked on "embed URL." I pasted the link in the box and pressed "Apply."

Finally, I resized the table to fit my Site. And, that's it!
You can click on the preview button at any time to view the preview version of your site.

When you are ready to go, just press "Publish." FYI - if you go back and edit your Site, you will need to press "Publish" for your changes to be live.
Stay tuned for more detailed presentations to come. In the meantime, try playing with the New Google Sites!
While the new version still lacks some necessary features like being able to hide pages from the navigation bar (but still have them visible), remove header slots, control width of site, and control some of the font colors (limited options), the simplistic design is ideal for teachers. In fact, I would not want too many options. The more options, the more room for "ugly" Sites and...who wants that?
With the new Google Sites, you are guaranteed to have a more professional looking site.
I plan on updating my fennovation.org Google Sites resources as I find more ways to customize your Sites (beyond the how-tos out there currently).
In the meantime, check out the new version or our digital citizenship site as compared to the traditional Google Sites version.
I used Canva to create a header (public version so you can make a copy and edit it). I also used Canva to create circle icons on some of the pages (public version so you can make a copy and edit it).
And, because the Awesome table folks are so awesome, they have made Awesome tables accessible on the New Google Sites!
To use it, you can still create an existing Awesome Table (see my previous blog).
Once you have created one, you can see your creations from Awesome Tables. Since I already had them in my existing site, I was able to go to the old site and go to editing mode.

Then, I clicked on the Awesome Table & the gear.

From that menu, I clicked on the table name.

Then, I changed the URL from "edit" to "view."
Next, I copied that URL.

Then, I went to the New Google Sites and, under "insert," I clicked on "embed URL." I pasted the link in the box and pressed "Apply."

Finally, I resized the table to fit my Site. And, that's it!
You can click on the preview button at any time to view the preview version of your site.
When you are ready to go, just press "Publish." FYI - if you go back and edit your Site, you will need to press "Publish" for your changes to be live.
Stay tuned for more detailed presentations to come. In the meantime, try playing with the New Google Sites!
Saturday, July 9, 2016
2015-2016 school year re-cap & suggestions
A year ago, I left my job in public school to enter the private sector. I did not know then how different and difficult my year would be.
Due to those difficulties, I made a commitment to myself to write a review of my year to better reflect on my accomplishments and struggles and to help those in a similar situation.
This past school year, I found myself on the verge or at burn-out levels multiple times. And, I'll admit, I still struggle despite it being summer. I found myself questioning my effectiveness; questioning my job. Have you felt that way before?
I found myself at levels of disappointment I had not felt since my first year of teaching.
That's when I realized this was my first year. Though I had more years of experience behind me, this was a new phase. This was a transition. I had taken a leap and now, I was finding my footing.
I am still finding my footing. We are all still finding our footing. And, if you have found it, it's time to take another leap.
It's that point of frustration we want to keep our learning an our students' learning at - that point where you want to quit, but you won't because you want to see through the journey. In a classroom, we support our students through this. Professionally, it can be isolating. This was my struggle. And, unfortunately, I didn't realize it until the year was nearly over. So, my goal for 2016-2017 - keep my network of support close. Don't pull the weight on your own.
I spent a lot of time alone, planning. I did not spend time collaborating. I need collaboration. Again, don't isolate yourself. Reach out. Don't be shy.
In my time alone, I had plenty of time to dwell on what wasn't happening. When things are moving fast, there is little time to focus on the negative and only time to embrace the movement. So, take breaks. Write down your accomplishments. Make note of your successes. And, when all else fails, get up and take a quick walk. Rinse and repeat.
I found myself becoming negative and uninspired. At this moment, take a break and create. Create, create, and create. It will instantly boost your inspiration. And, you might discover a new idea to implement.
I have plenty of fears for this next year, plenty of challenges, and, hopefully, plenty of positive moments.
Next year, I'll be teaching freshmen English again for the first time in six years and a makerspace course - the first of its kind at my school. I'll also be continuing my normal job as a technology integration coordinator. My work is cut out for me. I'm excited for the busyness. I'm also nervous and anxious, much like our students are.
This school year, I am going to blog more about my daily experiences rather than just my successes. Writing is therapy. Sharing is therapy. Sharing leads to collaboration and networking.
This year, I started a digital citizenship team that led chapels, parent discussions, and student panels. I also created a makerspace course and helped set up three smaller ones around campus. I also created an infrastructure for change. It's the last point that is hard to see and believe. I still don't fully believe it. I'm sure many of us have been here before.
This year was nothing short of a challenge. And, I won't sugar coat my experiences. However, I won't let them define me, my job, my school, or my work. Rather, when the challenges get heavier, I will write more and share more.
We are connected. Share your experiences and grow.
What were your experiences this school year? What will you do next school year? What advice do you have to share?
Wednesday, May 25, 2016
Bring the power of digital citizenship to a school near you
This year, I took a new position, which gave me a chance to start fresh with digital citizenship. Over the course of the year, I documented our process for easy implementation at other schools.
Check out our progress and share your success, challenges, and learnings!
Check out fennovation.org for all things digital citizenship as well as Let's Get Digital: Citizenship.
Check out our progress and share your success, challenges, and learnings!
Check out fennovation.org for all things digital citizenship as well as Let's Get Digital: Citizenship.
Friday, May 20, 2016
The Maker Journey
This year, I started a makerspace initiative at my new school (a private school for the first time in my career). Over the year, I decided to document it for others to use who are interested in bringing maker to their school, classroom, or district.
Check out The Maker Journey and fennovation.org for all things maker!
Check out The Maker Journey and fennovation.org for all things maker!
Wednesday, May 18, 2016
Let's Get Chromified this summer! Plus, new updates!
I was saddened to read last week that support for the Snagit Chrome Extension will end this summer. That was one of my top five favorite extensions.
With that in mind, I've added a few other screen capturing tools to the Let's Get Chromified list, including:
MediaCore Capture: "You can capture anything on your screen — including your web browser, applications and desktop — or record video straight from your webcam. MediaCore Capture also makes it easy to overlay video from your webcam on a screencast recording — perfect for recording presentations, assignments and demos. "
Capture Cast: "CaptureCast Chrome is a FREE video screen capture extension with no restrictions on the length of your recordings. You can use the screencast recorder to capture your desktop screen, web camera, document camera, and microphone with seamless uploading to YouTube and Vimeo."
I've also added Alice Keeler's Drive 20, which will open up the first 20 files in Drive with one click. Of course, you can also change the 20 to another number as well.
And, I also added Drive Tunes, an app that turns your Google Drive into a media player. And, with unlimited storage in your school Drive, why not put all of those chorale tunes in there and hit play?!
You can check out all things Chrome at fennovation.org. You can also check out the Let's Get Chromified full presentation or this summer's exclusive Let's Get Chromified: Productivity Edition.
Monday, May 16, 2016
Google Classroom - my favorite uses!
It's almost time for summer break and what better time to explore some uses of Google Classroom than now?! Once school starts, the year often gets too busy to check out and integrate new uses, so why not start now?
Today, I gave my Classroom presentation a major face-lift. I also added a few updates including:
Check out fennovation.org for more Googleness and check out Getting Automated with Google Classroom for 50 slides worth of ideas!
Happy Monday!
Today, I gave my Classroom presentation a major face-lift. I also added a few updates including:
- Wizer.me - I discovered this during #txgoo this past weekend. This site allows you to create and browse interactive classroom resources that share nicely on Google Classroom.
- Schedule posts - if you haven't heard, you can now do this on Google Classroom
- Guardian access - coming this fall
- Polls - in addition to the Q&A feature on Google Slides, you can get immediate feedback on Google Classroom. Hip, hip, hooray!
- Google Calendar - you get a Calendar for every class. You can share these calendars for anyone with the link to see and put them on your Website. This gives others access to view assignment due dates.
Check out fennovation.org for more Googleness and check out Getting Automated with Google Classroom for 50 slides worth of ideas!
Happy Monday!
Google Apps Hacked: More updates for your summer! Scan & convert files with your phone!!
I love finding new uses for my favorite Google Apps. Recently, I discovered a few things I did not know that you could do:
(My favorite is #2)
Check out fennovation.org for more Googleness as well as the Google Apps Hacked presentation where you can find many "hacks" on your favorite apps. I challenge you to try at least one in your daily use!
Happy Monday!
- Provide links for direct download (instead of linking to a file in your Drive that someone will have to download, link to the download link so it automatically downloads)
- Scan documents with your phone and convert them to editable text in a Google Doc - yes, this is a real thing!
- Save YouTube videos to your Google Drive!
(My favorite is #2)
Check out fennovation.org for more Googleness as well as the Google Apps Hacked presentation where you can find many "hacks" on your favorite apps. I challenge you to try at least one in your daily use!
Happy Monday!
Thursday, April 28, 2016
#YourEduStory: Brown-out: it's a real thing
This week's #youredustory topic: what's your biggest challenge as an educator? As a person?
I purposely wrote this topic because we often forget one another's struggles. We become observed in our own struggles. We hide our own challenges. We don't post the full picture.
So, this week is a chance to be authentic and to provide support for those in your educator community or greater community.
Last year, I read an article about brownout and I instantly connected with it. It's something many of us have or have experienced it in the past. You may even know someone who's dealt with it.
For me, the realization was embarrassing. And, I felt alone in that feeling.
I was still the same self I knew - I worked hard and I would not settle for failure. Sure, I'd fail. But, I'd never let that be my resting place. When I admitted I was suffering from brownout, I felt like I was quitting; like I wasn't giving my best effort. And, I was embarrassed by that. I was comparing what was really happening with my views of how I should be behaving. And, that's a hard comparison to hold.
I found myself trying to compete with everyone and everything. It was less about learning and more about competing. And, after a while, that is overwhelming. I came home and continued to work. I never unplugged.
There is no one way to suffer from brownout. For me, I didn't give up my other loves. I felt more compelled than ever to continue them. In fact, I felt stressed to make sure I found time for them. If I didn't have time to paint, I felt stressed. If I didn't have time to visit my family, I felt stressed. If I had to do work when I got home, I felt stressed. I felt I couldn't escape being stressed.
Brownout can be about the job, but it's usually something larger. For me, it was a reminder that I have many ambitions that I want to pursue. And, that is my stress-er. My own drive for success has the potential to drive me to brownout.
And, it did. I can't pinpoint a particular day, but I know the time when I stopped feeling joy from the things that I did to make me happy.
At the time, I felt alone in my struggles. As an active sharer and participant on Google + and Twitter, I was sucked into the "echo chamber." I only saw the great things everyone else was doing or trying to do. I wanted to do it all as well, but yet, struggled to find the joy I found on their social media faces. I found that, while we are great at sharing ideas, we struggle in sharing our struggles.
It wasn't until I read a blog from The Nerdy Teacher, who opened up about his depression, that I realized other successful educators have struggles. It wasn't until I opened up about my own frustrations that I found others - many others - who shared in my journey.
We ask students to reflect on their online self vs. their real self, but, as educators, we do not always do this. I looked at my online self and realized others would never know I struggled with brownout. So, here I am - sharing and hoping others will too.
I also recognize that my personality is prone to brownout. I'm ambitions. I'm competitive. I want to learn more. I want to do more. I want to be more. But, at the end of the day, that can be stressing. It can also be taking work home and letting it consume your time. And, this is the number one factor leading to brownout. For me, I have to continuously check myself. It will never be as simple as "don't do too much." But, it is possible. And I also recognize that many highly successful people have these same qualities. It's what drives you and burns you.
So, I challenge you to take a moment to reflect on your online self. Who are you? Do you represent the real you? Do you find yourself competing with others online? Do you want to try everything?
While these qualities make use better, they also can lead us to brownout.
Think...do you (from "Are You Suffering From Brownout":
When I answered these questions, I found myself answering "yes" to many. I felt like I never finished any tasks. In many ways, I still do. So, this year, I've made a goal to finish what I started - this includes all of the crafts, cleaning, etc. And, you know what? I feel accomplished in that. I finished a quilt I started four years earlier. Not only did I feel accomplished, but I spent time doing an activity I enjoyed. A win-win.
If you found yourself answering "yes" to any of the questions or if you feel exhausted right now (let's face it - who doesn't?) My advice to you:
I purposely wrote this topic because we often forget one another's struggles. We become observed in our own struggles. We hide our own challenges. We don't post the full picture.
So, this week is a chance to be authentic and to provide support for those in your educator community or greater community.
Last year, I read an article about brownout and I instantly connected with it. It's something many of us have or have experienced it in the past. You may even know someone who's dealt with it.
For me, the realization was embarrassing. And, I felt alone in that feeling.
I was still the same self I knew - I worked hard and I would not settle for failure. Sure, I'd fail. But, I'd never let that be my resting place. When I admitted I was suffering from brownout, I felt like I was quitting; like I wasn't giving my best effort. And, I was embarrassed by that. I was comparing what was really happening with my views of how I should be behaving. And, that's a hard comparison to hold.
I found myself trying to compete with everyone and everything. It was less about learning and more about competing. And, after a while, that is overwhelming. I came home and continued to work. I never unplugged.
There is no one way to suffer from brownout. For me, I didn't give up my other loves. I felt more compelled than ever to continue them. In fact, I felt stressed to make sure I found time for them. If I didn't have time to paint, I felt stressed. If I didn't have time to visit my family, I felt stressed. If I had to do work when I got home, I felt stressed. I felt I couldn't escape being stressed.
Brownout can be about the job, but it's usually something larger. For me, it was a reminder that I have many ambitions that I want to pursue. And, that is my stress-er. My own drive for success has the potential to drive me to brownout.
And, it did. I can't pinpoint a particular day, but I know the time when I stopped feeling joy from the things that I did to make me happy.
At the time, I felt alone in my struggles. As an active sharer and participant on Google + and Twitter, I was sucked into the "echo chamber." I only saw the great things everyone else was doing or trying to do. I wanted to do it all as well, but yet, struggled to find the joy I found on their social media faces. I found that, while we are great at sharing ideas, we struggle in sharing our struggles.
It wasn't until I read a blog from The Nerdy Teacher, who opened up about his depression, that I realized other successful educators have struggles. It wasn't until I opened up about my own frustrations that I found others - many others - who shared in my journey.
We ask students to reflect on their online self vs. their real self, but, as educators, we do not always do this. I looked at my online self and realized others would never know I struggled with brownout. So, here I am - sharing and hoping others will too.
I also recognize that my personality is prone to brownout. I'm ambitions. I'm competitive. I want to learn more. I want to do more. I want to be more. But, at the end of the day, that can be stressing. It can also be taking work home and letting it consume your time. And, this is the number one factor leading to brownout. For me, I have to continuously check myself. It will never be as simple as "don't do too much." But, it is possible. And I also recognize that many highly successful people have these same qualities. It's what drives you and burns you.
So, I challenge you to take a moment to reflect on your online self. Who are you? Do you represent the real you? Do you find yourself competing with others online? Do you want to try everything?
While these qualities make use better, they also can lead us to brownout.
Think...do you (from "Are You Suffering From Brownout":
- Work long hours, but without any real interest in your job? Is work a dull slog and does it lack intellectual challenge or stimulation.
- Feel as if you never really finish tasks? There’s always more to do.
- No longer know where your career is going?
- Pour cold water on other people’s ideas?
- Use any excuse not to show up? A headache becomes a migraine and a cold is always flu.
- Check emails when you get up in the morning and in bed before you to sleep? Glued to your Smartphone?
- Feel out of shape, eat junk food, lack sleep?
- Feel you’ve lost your sense of humor and tend towards passive aggressiveness and surliness.
- Come home late to watch TV and show little interest in your spouse and children? Friendships have withered on the vine and outside interests have been forgotten.
- Feel you're boss is moody and unpredictable (though you don't hate your boss)? You never know whether they’ll like or hate a given piece of work.
When I answered these questions, I found myself answering "yes" to many. I felt like I never finished any tasks. In many ways, I still do. So, this year, I've made a goal to finish what I started - this includes all of the crafts, cleaning, etc. And, you know what? I feel accomplished in that. I finished a quilt I started four years earlier. Not only did I feel accomplished, but I spent time doing an activity I enjoyed. A win-win.
If you found yourself answering "yes" to any of the questions or if you feel exhausted right now (let's face it - who doesn't?) My advice to you:
- Be a full person online. You don't have to share every personal struggle. However, you should represent both sides to your story. For instance, if you share that you did an awesome maker unit, share where that unit fits into the larger picture. What challenges did you face along the way? What challenges do you still face? I know I'm guilty of this as well - especially in my personal life. We see the highlights.
- Don't compare yourself to others online. Remember - you see the highlights so don't live the highlight reel. Use what you see and read as inspiration but remember that you are only seeing a slice of their story. Keep yourself grounded in those around you.
- Remember what you value and don't lose sight of it. At the end of a hard day, it can be exhausting and difficult to be positive to those around you. And, that's okay. But, don't forget what you value. Make time for it. Schedule it if you need to, but don't miss out. And, if finding time for it is stressing you, reevaluate your tasks and priorities. What are you doing that you can drop?
- Leave your Smartphone and devices behind. This one is very challenging for me. I'm in the edtech industry (or whatever we want to call it now)! But, the phone becomes a clutch. I find myself checking my emails when I first wake up and before I close my eyes at night. I find myself feeling anxiety over notifications. I find myself using it to avoid awkward social situations - to get out of having to have a real conversation. It gets more attention than some I love the most. Don't love your Smartphone. Use it as a tool to spend more time with those you love. It's that distinction that makes all the difference.
- Exercise. Those who know me probably think this is easy for me to say because I do workout excessively. I know this. But, I love it. The more difficult the workout, the happier I am. You don't have to be a workout nut like me to exercise. The point is you should make time for it each day. This is not only because it is essential to health, but because it is rejuvenating. I started taking short walks outside periodically throughout the day and, gradually, it made me look forward to each day a little more (especially when I find myself dreading the coming days).
I spend a lot of time teaching digital citizenship to tweens and teens, but not enough to my peers. We need to support one another - especially in the area of showing our authentic selves.
Be authentic. Be you. Be okay with you.
Tuesday, April 26, 2016
More secrets of a Google Ninja
Today's blog post brings you two new secrets of a Google Ninja!
- Google Save: I had noticed this for a bit, but hadn't paid much attention to it until I read Eric Curts' blog post on the tool. This will allow you to save images and websites virtually without downloading!
- Chrome Music Lab: This is for music-lovers of all ages! You can now explore the way music works and, since it is open to all developers, develop your own music experiment.
Explore these handy tools and more at the full Secrets of a Google Ninja presentation or on fennovation.org (where there is an Awesome Table directory).
I will be sharing all of these tools - yes, all - at the Techs4Tex Texas Summit on Saturday, May 14 in Frisco, Texas. Tickets are still available if you're near the area!
Friday, April 22, 2016
Girl Power: Coding Edition
This year has been an amazing year for bringing awareness to the gender gap...especially in the STEM industry.
And, recently, I discovered two more organizations that are helping reduce the gap.
Check out:
And, recently, I discovered two more organizations that are helping reduce the gap.
Check out:
To see a more extensive list of programs to join as well as resources to assist the girls in your life in STEM (computer science, and more!), check out Girl Power.
Check out fennovation.org for a complete list of STEAM resources as well.
Wednesday, April 20, 2016
Chromium Creativity
Chromebooks are a great device for being productive, but they can be overlooked when it comes to creation. Though I have nothing against MacBooks' performance, their price is steep. For a fraction of the price, you can get a Chromebook that can create beautifully. If you are a professional designer, a MacBook or another full-scale device might be necessary. However, for the average consumer, Chromebooks offer a full line of free or affordable apps for creation.
I've organized some of my favorite creation tools for K-12 students into Chromium Creativity (it says K-5 since many can be used for K-5, but they could also be used for K-12). Per viewer suggestions, I've also added in suggested ages as it can sometimes be hard to find appropriate applications for PK-2 students. Check the presentation notes section for more details.
Check out fennovation.org for even more Googleness!
Friday, April 15, 2016
Hosting a family coding night - a review
This week, I hosted a family coding night for all staff, students, parents, and community members.
After talking with parents throughout the year, I found that many wanted to engage with their children while using technology, but didn't know how. I'm an advocate of creating with technology. So, with that in mind, I decided to offer a night of coding and creating for all families and staff.
In making plans for the event, I considered time, location, and topics. The last time I held a school maker night (though well attended), several attendees suggested having the event later, after practice. I also wanted to make sure the location would be able to hold many students and parents. So, I held this event from 5:30-7:30PM in our library with the intent of recruiting more of our high school students.
Before creating the event, I searched what other schools around the world were doing. I stumbled upon one school who hosted sessions for families to attend - like an actual conference. I loved this idea. This would give families designated times to attend things that interested them.
I decided to offer sessions in 30 minute time slots - so a total of four sessions possible to attend. Then, I divided up topics by the device. For instance, I offered four sessions of coding on the iPad/Chromebook; four on desktops, four through robotics/microprocessors, and four without a device. You could split this differently, but I thought these would introduce families to the types of devices they could use to code. For each device, I found a tutorial for a coding session. For instance, I found one on Hopscotch with iPads. Every session had a linked tutorial assigned to it. The idea behind this - students could continue their learning and creation when they returned home.

With the schedule in place, I started recruiting volunteers. I sent out emails to our students, our parents, area organizations, and former students. At first, it seemed to be pulling teeth to get volunteers, but I eventually got plenty of volunteers for the event. Advice: Don't stop asking for help. I found that - through repetition - I convinced more to join our efforts.
After recruiting volunteers, I began the bulk of the work - setting everything up. Since I only wanted our volunteers to be facilitators, I had to make sure everything was set up. The challenge - students were still using the library during set-up and throughout the event. So, I had to continually check on our areas to make sure they had not been "re-designated" by students. I printed off signs, session cards for attendees to take with them throughout the night, and materials for the no device area. I set up obstacle courses for the Sphero with duct tape, card board, and the like. To figure out what I needed to do, I went through the schedule and made a list of all of the materials listed in each tutorial. Give yourself plenty of time for this portion. I started a few days early, gathering materials, charging devices, and printing signs.
You can view the complete Agenda with a description of events, links to tutorials, and sessions.
When the night finally came, a few attendees showed up right at 5:30, but most arrived around 5:40ish.
The hits:
The things I would change:


 |
| The advertisement - created using Canva. |
After talking with parents throughout the year, I found that many wanted to engage with their children while using technology, but didn't know how. I'm an advocate of creating with technology. So, with that in mind, I decided to offer a night of coding and creating for all families and staff.
In making plans for the event, I considered time, location, and topics. The last time I held a school maker night (though well attended), several attendees suggested having the event later, after practice. I also wanted to make sure the location would be able to hold many students and parents. So, I held this event from 5:30-7:30PM in our library with the intent of recruiting more of our high school students.
Before creating the event, I searched what other schools around the world were doing. I stumbled upon one school who hosted sessions for families to attend - like an actual conference. I loved this idea. This would give families designated times to attend things that interested them.
I decided to offer sessions in 30 minute time slots - so a total of four sessions possible to attend. Then, I divided up topics by the device. For instance, I offered four sessions of coding on the iPad/Chromebook; four on desktops, four through robotics/microprocessors, and four without a device. You could split this differently, but I thought these would introduce families to the types of devices they could use to code. For each device, I found a tutorial for a coding session. For instance, I found one on Hopscotch with iPads. Every session had a linked tutorial assigned to it. The idea behind this - students could continue their learning and creation when they returned home.

With the schedule in place, I started recruiting volunteers. I sent out emails to our students, our parents, area organizations, and former students. At first, it seemed to be pulling teeth to get volunteers, but I eventually got plenty of volunteers for the event. Advice: Don't stop asking for help. I found that - through repetition - I convinced more to join our efforts.
After recruiting volunteers, I began the bulk of the work - setting everything up. Since I only wanted our volunteers to be facilitators, I had to make sure everything was set up. The challenge - students were still using the library during set-up and throughout the event. So, I had to continually check on our areas to make sure they had not been "re-designated" by students. I printed off signs, session cards for attendees to take with them throughout the night, and materials for the no device area. I set up obstacle courses for the Sphero with duct tape, card board, and the like. To figure out what I needed to do, I went through the schedule and made a list of all of the materials listed in each tutorial. Give yourself plenty of time for this portion. I started a few days early, gathering materials, charging devices, and printing signs.
When the night finally came, a few attendees showed up right at 5:30, but most arrived around 5:40ish.
The hits:
- The Sphero and Tickle apps were a crowd favorite. But, before them, was the Arduino and the Make Crate session hooked all students!
- Attendees loved the choice in the sessions
- We provided room for others to continue learning a topic if it interested them
- The set-up beforehand was solid so we did not have technical difficulties
The things I would change:
- We did not have upper school students attend. I am guessing there is still a stigma around the word "coding." Plus, many of our students are over-committed. As a new program, it's hard to gain new members from the upper school. Lastly, we listed topics by what they would learn rather than by what they would create. The next time - I'm changing this to the things they will create. I believe this will help boost attendance since we had a large number attend our maker night. Clearly, there is an interest - it has to be in the wording and the recruitment.
- More careful scheduling. I paired the Arduino session - a major hit - during the same time as some other topics that would have been popular. As a result, they were not as well attended.
- In some areas, I would make them more informal. For instance - in the robotics area, I'd like to have this be a full two hours, but for students to pick an area (Raspberry Pi, Arduino, etc.) they would like to explore. Volunteers would be on hand to assist attendees in exploring.
I look forward to making changes to improve the next event. I also hope to bring in more area businesses who will, hopefully, sponsor the event. Food is a big selling point - which we did not have. I'd even like to add in some competitions for the end of it.
Ideas? Share them with me!


Wednesday, April 13, 2016
Raising student voices - the power of a positive online presence
I speak often about how I dislike the idea of focusing on what not to do online. We spend a lot of time instilling fear in adults and students about the online world rather than teaching them how to use to make change. In the process of teaching the don'ts, we've actually stopped teaching. We've started fearing.
So this year, we've made an effort to focus less on the don'ts and more on the dos.
Yesterday, we held two chapel services - one for middle school students and one for high school students (we are a private Episcopalian school so it works!). Over the past two months, we recruited various students who were rumored to have online presences. These online environments could be anything from a music sharing site, YouTube channel to a crowdsource funding page.
After getting a list of all of the rumored students, I sent out emails and used word of mouth to get in touch with the students. Though it took several attempts, I was able to get four high school and two middle school students to present, which was perfect due to our time limitations.
I met with each group, provided them with a script and turned them loose with a few questions.
The rest...they did. And, I was blown away.
I let each student know they would have three minutes or less to share their online presence, using my questions as guidance. I assigned them an order and asked them to send me the specific links they wanted us to show while in chapel. Once we received the links, we took screenshots of them in the event Wifi went down, and we reviewed the content. One student's music site had curse words in the comments section. Though, the student brought this up ahead of time and reminded us to make sure not to show certain sections.
I wish I had recorded the chapels, but I only managed to sneak a few photos of the students. I asked a teacher to read a quick 30 second intro and conclusion before the students spent the remaining 12 minutes sharing their work.
Below is the script I sent students and assisting faculty.
Topic: Feature 3-4 students at SSES who use their online presence for positive actions.
Date: 4/12/16
Students:
- MS: (Websites linked below)
- 1 - Rachel Swartz 6th grader, http://rachelswartzphotography.weebly.com/
- 2 - Sierra Coffey - this is a private video now, but was created using 1secondeveryday.com
- US: (Websites linked below)
- 1 - Sarika Mullapudi
- 2 - Mae Mouritsen & Ruby Bowman
- 3 - Abe Masaryk: https://soundcloud.com/fausuto, http://traktrain.com/fausuto
- 4 - Reilly Wieland: http://inklingwriting.co/ & Crash course in teen feminism & http://www.huffingtonpost.com/reilly-wieland/
Agenda:
- Overview - narrate: “Today, we have several St. Stephen’s students here to share examples of their online presence. Your online presence is anything that can be found when Googling your name. It’s important to not only avoid negative topics, but to make your name noticeable through the positive things you do online. For example, you can create a crowdsourcing page to raise money for a charity. You can start your own art portfolio. You can teach others on YouTube. Find your passion and share it. The following students did just that.” Teacher narrator.
- Introduce students in order (in background, project student site)
- Student 1 [steps to mic/podium]: (about 2-3 minutes)
- explain what your online presences is
- show what your online presence is
- explain why you created your online presence
- explain how you created your online presence
- Repeat for other students (2-3 minutes for each student)
- Conclusion - narrate: “Please help support these students. And, we challenge you to start something positive online. Raise money for a cause near to you. Teach others your skill. Share with others your passion.” Teacher narrator.
Each student was unique. No student fit any particular description. This helped keep it diverse and more approachable. One student even passed out fliers for interested girls who wanted to join her organization.
The bottom line - help raise student voices. Don't instill fear in those voices. I'm sure our chapel did not change behavior overnight, but I hope it did inspire others to use their voice to do good. I want to teach students to be positive. But, to do that, they have to use their voices.
Monday, April 11, 2016
Get your Google Sites ready for the summer
It's better late than never to start work on your online presence. Google Sites, though not perfect, are a tool of choice because of their integration within other Google Apps. That said, they can be use for far more than a teacher Website. Use them for digital portfolios, newsletters, events, directories, and much more!
And, if you're using them for teacher Websites, why not structure your courses on your site so that they look like touchscreen apps? Many times, I see courses in a traditional drop-down list with a lot of text. While this was common in the early 2000s, most students use a touchscreen device when accessing online content. And...that is not the most effective way of reaching that audience. I've started making my site full of pictorial boxes so they are not only easier to see, but easier to access.
Try out this idea:
Make your page with all of your courses look similar to Google Classroom.

You can make these boxes in Google Drawings and then, just hyperlink each box (see my image map tutorial below) to the correct page. OR...you can take a screenshot of your Google Classroom and insert it in Google Drawings. Then, just draw invisible boxes (see my image map tutorial below) over the squares and hyperlink them to the correct pages. This will make your courses page more visually pleasing while also being more accessible.
Check out my beginner and advanced Google Sites tutorials for more ideas. Thinking of doing portfolios next year with your students? Why not start now?!
Check out fennovation.org for more Googleness!
Wednesday, April 6, 2016
I was still using old Forms...but why?
Recently, I was helping a teacher create a superlatives voting Form. Previously, I had used the new Google Forms, but found some of the question types weren't there or it was missing some functionality. So, I told her to just switch to the old Forms for now.
After speaking with her though, I decided to actually compare/contrast the two. And, I'm ashamed to admit that I had not realized the new Forms has caught up with the old Forms. Though I use it several times a week, I had decided to stay in the old Forms (in my school account) and in the new Forms (in my personal). But, after reviewing the two, the only substantial difference is in the view.
Here's the breakdown of the new vs. old:
The interface:
The new Google Forms certainly has a cleaner interface. It looks more friendly. However, it lacks some of the functionality of the old Forms.
Settings:
The settings are located in different locations in the versions. In the old version, the settings appear at the top and at the very bottom. In the new, you must click the gear (a consistent tool throughout Google products) to view the settings. While this helps keep the interface cleaner, it is another click for users.
In the old Forms, you have the following options.


In the new Forms, you will see the same options, but in a different layout.
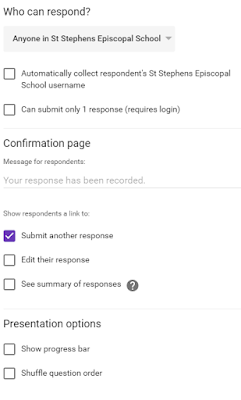
Themes:
In the old Forms, users can change fonts, font sizes, colors and, backgrounds. In the new Forms, users can add an image of their own to the header (same as old). However, it will automatically pair a solid color with it. It also does not allow for font selection and font sizing.
Questions:
The old Forms offers the following questions types.

And, the new Forms offers the following question types.
For a while, when you selected Date or Time as question types in the old Forms, you could choose to do both. For instance, if you selected Date, you could add Time to that question as well. In the new Forms, this was not an option. It is now, but it is disguised...
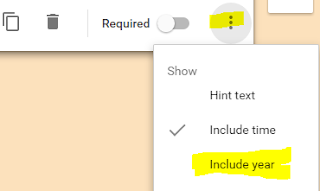
Otherwise, the question types are the same - only in different locations.
Responses:
This feature is definitely improved in the new Forms. Now, you can view a summary of responses (previously only accessible through the corresponding sheet) and the individual responses. Before, it only showed the responses in a spreadsheet. Now, you can see them in their Form view and print/save as PDF in that view as well. This is a huge improvement.
Individual response view:

Summary response view:

Add-ons:
This feature is the same in new and old. However, I find it a bit confusing. there is a button that says "add-ons" when you hover over it. These are the add-ons YOU have installed. To get more, you have to click on the three vertical dots in the far right and choose "Add-ons."

Sharing Form:
The sharing feature is nearly the exact same. The only difference is in the appearance and location. The only real difference is in viewing the live Form. In the old version, you could click on "View Live Form." This is now called "Preview."
I have finally moved both of my views to the new Google Forms. Though, I miss the editing features of the fonts in the old...
You can check out some of my favorite Forms features and uses in Fabulous-ize Your Forms presentation. You can also check out fennovation.org for all things Drive.
Enjoy!
After speaking with her though, I decided to actually compare/contrast the two. And, I'm ashamed to admit that I had not realized the new Forms has caught up with the old Forms. Though I use it several times a week, I had decided to stay in the old Forms (in my school account) and in the new Forms (in my personal). But, after reviewing the two, the only substantial difference is in the view.
Here's the breakdown of the new vs. old:
The interface:
The new Google Forms certainly has a cleaner interface. It looks more friendly. However, it lacks some of the functionality of the old Forms.
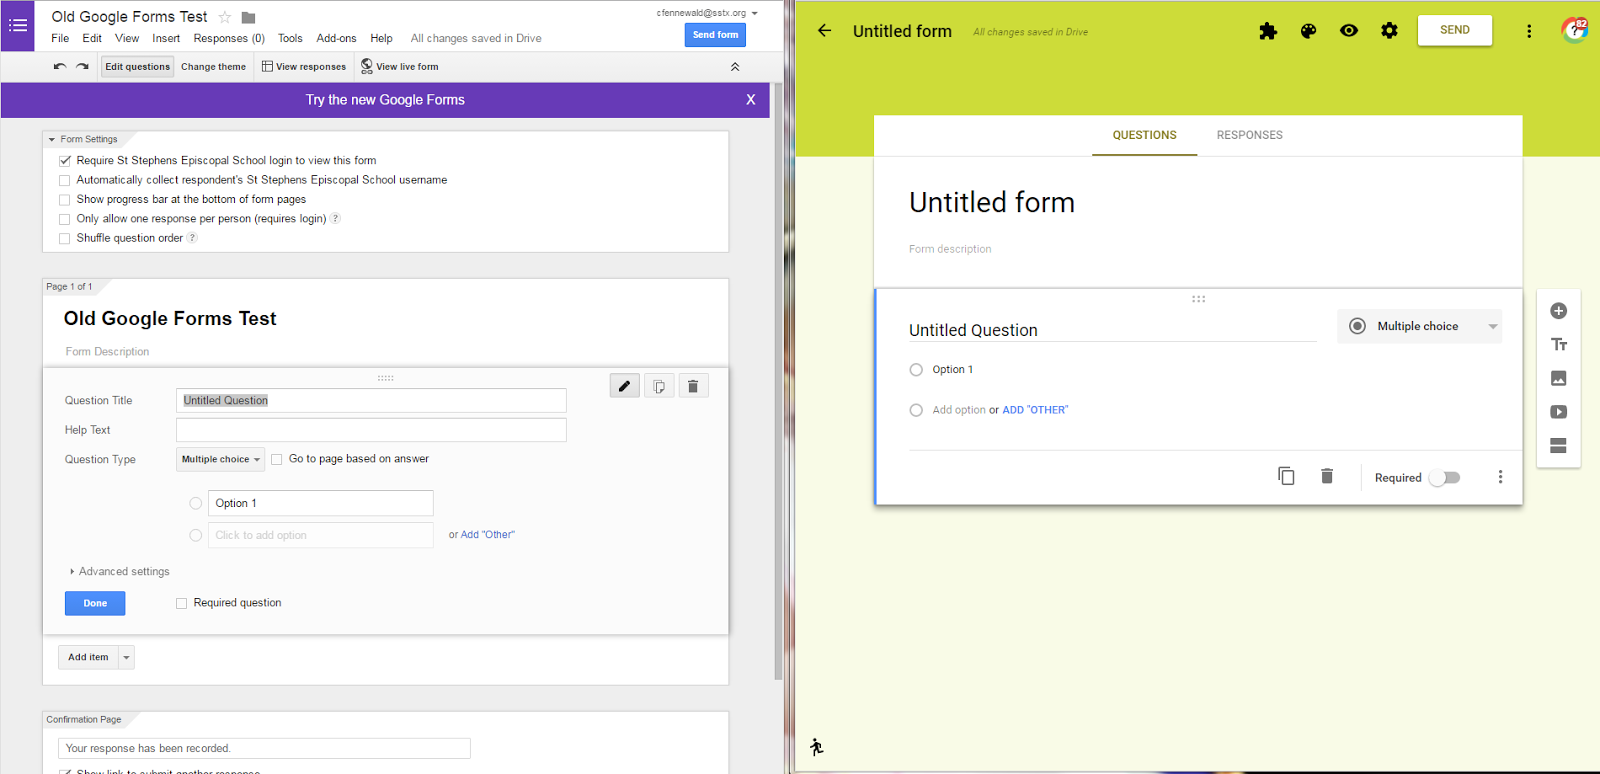 |
| Old Forms is on left; new Forms is on right |
Settings:
The settings are located in different locations in the versions. In the old version, the settings appear at the top and at the very bottom. In the new, you must click the gear (a consistent tool throughout Google products) to view the settings. While this helps keep the interface cleaner, it is another click for users.
In the old Forms, you have the following options.


Themes:
In the old Forms, users can change fonts, font sizes, colors and, backgrounds. In the new Forms, users can add an image of their own to the header (same as old). However, it will automatically pair a solid color with it. It also does not allow for font selection and font sizing.
Questions:
The old Forms offers the following questions types.
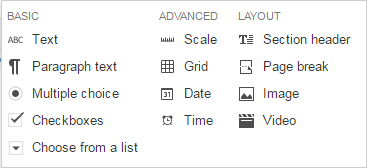
And, the new Forms offers the following question types.
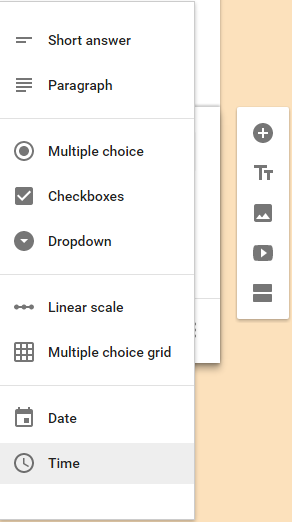
For a while, when you selected Date or Time as question types in the old Forms, you could choose to do both. For instance, if you selected Date, you could add Time to that question as well. In the new Forms, this was not an option. It is now, but it is disguised...

Otherwise, the question types are the same - only in different locations.
Responses:
This feature is definitely improved in the new Forms. Now, you can view a summary of responses (previously only accessible through the corresponding sheet) and the individual responses. Before, it only showed the responses in a spreadsheet. Now, you can see them in their Form view and print/save as PDF in that view as well. This is a huge improvement.
Individual response view:

Summary response view:

Add-ons:
This feature is the same in new and old. However, I find it a bit confusing. there is a button that says "add-ons" when you hover over it. These are the add-ons YOU have installed. To get more, you have to click on the three vertical dots in the far right and choose "Add-ons."

Sharing Form:
The sharing feature is nearly the exact same. The only difference is in the appearance and location. The only real difference is in viewing the live Form. In the old version, you could click on "View Live Form." This is now called "Preview."
I have finally moved both of my views to the new Google Forms. Though, I miss the editing features of the fonts in the old...
You can check out some of my favorite Forms features and uses in Fabulous-ize Your Forms presentation. You can also check out fennovation.org for all things Drive.
Enjoy!
Subscribe to:
Posts (Atom)